开篇 前言 可能是想试下目前能力极限,证明下自己还是没忘引擎的本,顺便备战春招;也可能是受动物井,Games104等的启发;还有可能是最近拆了Godot以及Jolt的设计感觉好像也没那么难。总之就是开始写自己小引擎,值此新年之际算是有了阶段性成果,故而才有了这个系列。
来的应该基本都是内行,这里也就简单介绍下功能:物体树状组织,组件赋予功能,场景序列存取。渲染采用OpenGL+GPU Instance,模拟采用线程池+工作窃取。然后重点再介绍下名称和图标,名称与宝可梦的多变怪同名,因为开始就想的以物理模拟为主,毕竟个人很注重游戏中的交互体验,反馈到技术栈上就是图形学的模拟动画。图标形象则主要取自洛克王国的多灵,大概是个人页游退坑前夕出的宠物,很喜欢其背景设定的“传说中灵魂的收集者,通过吸收其他宠物的灵魂,来塑造自己的身躯”,个人在写引擎功能架构时也多有借鉴成熟引擎的操作。
准备 首先,在写之前应该对引擎架构及自己的能力有一定基本认知。按照Games104 ,引擎应该包含 5 层架构:
功能层:提供引擎表面的基础服务。渲染、Game Tick、数值等。
工具层:提供开发人员的可交互编辑内容。
核心层:提供底层支持。例如内存管理及 3D 引擎常用的向量计算。
资源层:管理创作资产。
平台层:提供跨平台支持。
其中平台层一看就不是我等小引擎能涉及的存在,资源层的话处理各种图片视频音频模型想想都很费事,调库的话可能能帮下,姑且按下不表。其他三层再砍的话引擎就可以不用跑了,目前项目代码也按此架构。
1
2
3
4
5
6
7
8
9
10
Ditto/ ├── Engine/ │ ├── Core/ │ ├── Graphics/ │ ├── Physics/ │ └── Resources/ ├── Editor/ ├── Assets/ ├── 3rdParty/ └── ...
界面 前言 有了基本架构后,第一步该做当然是处理渲染。没办法,无论你做了什么,只有渲染出来才会被看见。相较于场景,个人先做的UI界面,毕竟UI在场景的上层先被看到,且有了Editor界面后整体看上去才更像个引擎。
准备 这各种文字,按钮,输入框,自己搓过于费时费力,且美观度有待商榷。所以我走的IMGUI ,底层有OpenGL,DirectX,Vulkan等多种可选,所有的控件都手动指定实现,当然性能也是极佳的。也有一个专门的网站演示 其能达到的效果。大致用法如下,和Unity Editor写法有些许相似。
1 2 3 4 5 6 7 8 9 10 11 12 13 14 15 16 17 18 19 20 21 22 23 24 ImGui::Begin ("设置面板" , nullptr , ImGuiWindowFlags_AlwaysAutoResize); static bool showExtra = false ;ImGui::Checkbox ("显示高级选项" , &showExtra); static float brightness = 0.8f ;ImGui::SliderFloat ("亮度" , &brightness, 0.0f , 1.0f , "%.2f" ); static int quality = 2 ;const char * levels[] = { "低" , "中" , "高" };ImGui::Combo ("质量" , &quality, levels, IM_ARRAYSIZE (levels)); if (showExtra) { ImGui::Separator (); static float color[3 ] = { 1.0f , 1.0f , 1.0f }; ImGui::ColorEdit3 ("背景色" , color); if (ImGui::Button ("重置" )) { color[0 ] = color[1 ] = color[2 ] = 1.0f ; } ImGui::SameLine (); ImGui::Text ("点击恢复默认" ); } ImGui::End ();
绘制 一般来说,引擎都会有Tool,Scene,Game,Hierarchy,File,Inspector等界面。个人不想做资源层Ban掉File,不想做做多视图故合并Scene和Game。大概这里就只用做Tool工具栏,Hierarchy层级,Scene视图,Inspector属性。
1
2
3
4
5
6
7
8
9
10
11
12
13
14
15
void Editor::Draw () ImGui_ImplOpenGL3_NewFrame (); ImGui_ImplGlfw_NewFrame (); ImGui::NewFrame (); DrawToolbar (); if (showHierarchy) DrawHierarchy (); if (showScene) DrawScene (); if (showInspector) DrawInspector (); DrawPopups (); ImGui::Render (); ImGui_ImplOpenGL3_RenderDrawData (ImGui::GetDrawData ()); }
绘制工具栏 先从顶部工具栏开始,由于不考虑各种扩展插件,所以工具栏只有保存/加载场景,显示/隐藏界面的作用。
1
2
3
4
5
6
7
8
9
10
11
12
13
14
15
16
17
18
19
20
21
22
23
24
25
26
27
28
29
30
31
32
33
34
35
36
37
38
39
40
41
42
43
44
45
46
47
48
49
50
51
52
53
54
void Editor::DrawToolbar () if (ImGui::BeginMainMenuBar ()) { if (ImGui::BeginMenu ("File" )) { if (ImGui::MenuItem ("Save Scene" , "Ctrl+S" )) showSavePopup = true ; if (ImGui::MenuItem ("Load Scene" , "Ctrl+L" )) showLoadPopup = true ; ImGui::EndMenu (); } if (ImGui::BeginMenu ("View" )) { if (ImGui::MenuItem ("Toggle Hierarchy" , NULL , showHierarchy)) showHierarchy = !showHierarchy; if (ImGui::MenuItem ("Toggle Scene" , NULL , showScene)) showScene = !showScene; if (ImGui::MenuItem ("Toggle Inspector" , NULL , showInspector)) showInspector = !showInspector; ImGui::EndMenu (); } ImGui::SameLine (ImGui::GetWindowWidth () * 0.4f ); if (engine->state == Engine::State::Edit) { ImGui::PushStyleColor (ImGuiCol_Button, ImVec4 (0.2f , 0.7f , 0.2f , 1.0f )); ImGui::PushStyleColor (ImGuiCol_ButtonHovered, ImVec4 (0.3f , 0.8f , 0.3f , 1.0f )); if (ImGui::Button ("Play" )) engine->SetEngineState (Engine::State::Play); ImGui::PopStyleColor (2 ); } else { ImGui::PushStyleColor (ImGuiCol_Button, ImVec4 (0.8f , 0.2f , 0.2f , 1.0f )); ImGui::PushStyleColor (ImGuiCol_ButtonHovered, ImVec4 (0.9f , 0.3f , 0.3f , 1.0f )); if (ImGui::Button ("Stop" )) engine->SetEngineState (Engine::State::Edit); ImGui::PopStyleColor (2 ); } ImGui::SameLine (); if (engine->state != Engine::State::Stop) { if (ImGui::Button ("Pause" )) engine->SetEngineState (Engine::State::Stop); } else if (ImGui::Button ("Conti" )) engine->SetEngineState (Engine::State::Play); float windowWidth = ImGui::GetWindowWidth (), infoWidth = 300.0f ; ImGui::SameLine (windowWidth - infoWidth); ImGui::Text ("Scene:" ); ImGui::SameLine (); ImGui::PushItemWidth (150.0f ); if (ImGui::InputText ("##SceneName" , sceneNameBuffer, sizeof (sceneNameBuffer), ImGuiInputTextFlags_EnterReturnsTrue)) if (engine && engine->scene) engine->scene->name = sceneNameBuffer; ImGui::PopItemWidth (); ImGui::EndMainMenuBar (); } }
绘制功能界面 工具栏整完了,接着就是Hierarchy层级,Scene视图,Inspector属性三个功能界面。
首先是Hierarchy层级,由于个人采用的树状层级所以这里的逻辑显得更复杂。
1
2
3
4
5
6
7
8
9
10
11
12
13
14
15
16
17
18
19
20
21
22
23
24
25
26
27
28
29
30
31
32
33
34
35
36
37
38
39
40
41
42
43
44
45
46
47
48
49
50
51
52
53
54
55
void Editor::DrawHierarchy () float menuBarHeight = ImGui::GetFrameHeight (); float windowWidth = ImGui::GetIO ().DisplaySize.x; float windowHeight = ImGui::GetIO ().DisplaySize.y - menuBarHeight; float hierarchyWidth = 0.125f * windowWidth; ImGui::SetNextWindowPos (ImVec2 (0 , menuBarHeight)); ImGui::SetNextWindowSize (ImVec2 (hierarchyWidth, windowHeight)); ImGui::Begin ("Hierarchy" ); if (ImGui::BeginPopupContextWindow ()) { if (ImGui::MenuItem ("Create Cube" )) { GameObject* cube = new GameObject ("Cube" ); cube->AddComponent <RendererComponent>(RendererComponent::Type::Cube); engine->scene->gameObjects.push_back (cube); selectedObject = cube; } if (ImGui::MenuItem ("Create Sphere" )) { GameObject* sphere = new GameObject ("Sphere" ); sphere->AddComponent <RendererComponent>(RendererComponent::Type::Sphere); engine->scene->gameObjects.push_back (sphere); selectedObject = sphere; } ImGui::EndPopup (); } if (ImGui::BeginDragDropTarget ()) { if (const ImGuiPayload* payload = ImGui::AcceptDragDropPayload ("GAMEOBJECT" )) { GameObject* droppedObj = *(GameObject**)payload->Data; if (droppedObj) { if (droppedObj->parent) droppedObj->RemoveFromParent (); else { auto & rootList = engine->scene->gameObjects; auto it = std::find (rootList.begin (), rootList.end (), droppedObj); if (it != rootList.end ()) rootList.erase (it); } engine->scene->gameObjects.push_back (droppedObj); droppedObj->parent = nullptr ; } } ImGui::EndDragDropTarget (); } for (GameObject* obj : engine->scene->gameObjects) DrawGameObjectNode (obj); ImGui::End (); }
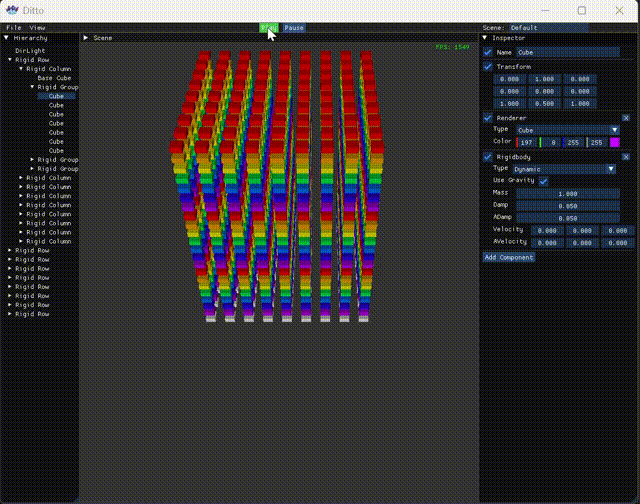
接着是Scene视图,没有什么特别逻辑,只是记录了下FPS以及PPF(物理耗时),毕竟引擎以物理为主,且涉及到多线程,需要精细对比。
1
2
3
4
5
6
7
8
9
10
11
12
13
14
15
16
17
18
19
20
21
22
23
24
25
26
27
28
29
30
31
32
33
34
35
void Editor::DrawScene () float menuBarHeight = ImGui::GetFrameHeight (); float windowWidth = ImGui::GetIO ().DisplaySize.x; float windowHeight = ImGui::GetIO ().DisplaySize.y - menuBarHeight; float hierarchyWidth = 0.125f * windowWidth; float sceneWidth = 0.625f * windowWidth; ImGui::SetNextWindowPos (ImVec2 (hierarchyWidth, menuBarHeight)); ImGui::SetNextWindowSize (ImVec2 (sceneWidth, windowHeight)); ImGui::Begin ("Scene" ); ImGui::Text ("Scene View" ); frame++; deltaTime += engine->deltaTime; if (deltaTime > 1.0f ) { fps = frame / deltaTime; ppf = 1e6 f * engine->physicsTime / engine->physicsCnt; frame = 0 ; deltaTime = 0 ; engine->physicsCnt = 0 ; engine->physicsTime = 0 ; } else if (deltaTime < 0 ) deltaTime = 0 ; ImVec2 windowPos = ImGui::GetWindowPos (); ImVec2 windowSize = ImGui::GetWindowSize (); ImGui::GetForegroundDrawList ()->AddText ( ImVec2 (windowPos.x + windowSize.x - 80 , windowPos.y + 20 ), IM_COL32 (0 , 255 , 0 , 255 ), ("FPS: " + std::to_string ((int )fps)).c_str () ); if (engine->state == Engine::State::Play) ImGui::GetForegroundDrawList ()->AddText ( ImVec2 (windowPos.x + windowSize.x - 80 , windowPos.y + 40 ), IM_COL32 (0 , 255 , 0 , 255 ), ("PPF: " + std::to_string ((int )ppf)).c_str () ); ImGui::End (); }
最后是Inspector属性,具体的组件交由物体绘制。
1
2
3
4
5
6
7
8
9
10
11
12
13
14
15
16
17
18
19
20
21
void Editor::DrawInspector () float menuBarHeight = ImGui::GetFrameHeight (); float windowWidth = ImGui::GetIO ().DisplaySize.x; float windowHeight = ImGui::GetIO ().DisplaySize.y - menuBarHeight; float hierarchyWidth = 0.125f * windowWidth; float sceneWidth = 0.625f * windowWidth; float inspectorWidth = 0.25f * windowWidth; ImGui::SetNextWindowPos (ImVec2 (hierarchyWidth + sceneWidth, menuBarHeight)); ImGui::SetNextWindowSize (ImVec2 (inspectorWidth, windowHeight)); ImGui::Begin ("Inspector" ); if (!selectedObject) { ImGui::End (); return ; } if (engine->state == Engine::State::Play) ImGui::BeginDisabled (); selectedObject->OnInspectorGUI (); if (engine->state == Engine::State::Play) ImGui::EndDisabled (); ImGui::End (); }
后记 之后,各种界面的雏形就出来了。这里可以用IMGUI的Main支,也可以用Docker支,使用Docker的话还能再整下窗口停泊等。但个人懒逼,所以目前就这样吧。
模拟 前言 前文说过要处理Play时的表现,那就直接开始吧。目前只有刚体,毕竟软体会打乱mesh结构,这让之前写的GPU Instance吃什么(GPU Instance:是啊,吃什么)。所以目前物理的主要工作还是碰撞处理,宽向使用AABB,窄向的话对这种几何体应该SAT检测更好些,但为了扩展性还是走GJK-EPA。
准备 这里还是简要介绍下前面提及的各碰撞检测算法,为了方便以下都以二维凸边形情况举例,且仅涉及算法思想。
分离轴算法(SAT) 算法思想很简单,找到一条轴能分开两物体,找不到就没碰撞。这样的话以物体的边作轴最快,三维情况下复杂度为边数和 O(n+m) 。
GJK-EPA GJK涉及到单纯形和闵可夫斯基差,对蓝色区域和绿色区域的碰撞检测,可以得到橙色区域,因橙色区域包含原点故发生碰撞。其中橙色区域的形状来自两区域的形状(想象蓝色区域为一个空架子,绿色区域为约束—将蓝色区域的某顶点限制在绿色区域的边上,绕绿色区域的边平移蓝色区域即可得到红色区域的形状),位置来自两物体的相对位置(CD间差(1,1),故J点(1, 1))。三维情况下的复杂度近乎常数,极端条件下才能到 O(n+m) 。
而EPA与GJK类似,但不是找原点,而是离原点最近的边以确定穿插深度。三维情况下的复杂度为 O(k(n+m+f)) 。
物理步进 主流程 主流程大致如下,因为刚体所以走的冲量方案,仅以位置修正为辅助防止持续穿透。
1
2
3
4
5
6
7
8
9
10
11
12
13
14
15
16
17
18
19
20
21
22
23
24
25
void Physics::UpdatePhysics (float dt) t += dt; if (t < deltaTime) return ; int steps = glm::min (3.0f , t / deltaTime); t = fmod (t, deltaTime); for (int step = 0 ; step < steps; ++step) { collisionData.clear (); colliderPairs.clear (); IntegrateForce (deltaTime); if (bvhTree) bvhTree->UpdateBVHTree (); HandleBroadCollisions (); HandleNarrowCollisions (); for (int iter = 0 ; iter < iterations; ++iter) SolveCollisions (iter); ApplyPositionCorrections (); } for (auto collider : colliders) collider->transform->UpdateTransform (); }
更新bvh树 这里简单贴下BVH树的更新流程。为了宽向AABB检测,我构造了基于SAH的AABB BVH树,每个物理帧更新并抽样重构以维持较优结构。
1
2
3
4
5
6
7
8
9
10
11
12
13
14
15
16
17
18
19
20
21
22
23
24
25
26
27
28
29
30
31
void BVHTree::UpdateBVHTree () if (!root) return ; UpdateAllAABBs (root); SampleAndRebuild (); } void BVHTree::UpdateAllAABBs (BVHNode* node) if (!node) return ; if (node->isLeaf) { Collider* collider = node->data.leaf.collider; if (collider && collider->isDirty) { collider->UpdateWorldAABB (); node->aabb = collider->aabb; } } else { UpdateAllAABBs (node->data.child.left); UpdateAllAABBs (node->data.child.right); node->UpdateAABB (); } } void BVHTree::SampleAndRebuild () if (leafNodes.empty ()) return ; BVHNode* nodeToReinsert = leafNodes[currentSampleIndex]; ReinsertNode (nodeToReinsert); currentSampleIndex = (currentSampleIndex + 1 ) % leafNodes.size (); }
宽向检测 既然有了BVH树,每次拿到一个AABB包围盒都可以直接靠树查询。但为了避免重复写入碰撞对,这里用了个标志位,只计入其和其前序的包围盒。
1
2
3
4
5
6
7
8
9
10
11
12
13
14
15
16
17
18
19
20
21
22
23
24
25
26
27
void Physics::HandleBroadCollisions () for (Collider* collider : colliders) { if (collider->rigidbody->type == RigidbodyComponent::Dynamic) { std::vector<Collider*> potentialCollisions; if (bvhTree) potentialCollisions = bvhTree->Query (collider->aabb); for (Collider* other : potentialCollisions) { if (other == collider) continue ; bool alreadyExists = false ; for (const auto & pair : colliderPairs) if ((pair.first == collider && pair.second == other) || (pair.first == other && pair.second == collider)) { alreadyExists = true ; break ; } if (!alreadyExists) if (other->rigidbody->type == RigidbodyComponent::Dynamic || other->rigidbody->type == RigidbodyComponent::Static) colliderPairs.push_back ({ collider, other }); } } } }
窄向检测 窄向的话用的就是之前提及的GJK-EPA,但相对于二维,三维情况下明显复杂了许多。如在构造单纯形时就要分别处理不同维度情况:
2点(线段):判断原点相对于线段的位置,更新方向或退化为单点。
3点(三角形):判断原点相对于三角形各边的位置,更新单纯形和方向。
4点(四面体):检查原点是否在四面体内(即与每个面的法线方向关系),如果原点在四面体内,返回真;否则抛弃最远的面,更新方向。
1
2
3
4
5
6
7
8
9
10
11
12
13
14
15
16
17
18
19
20
21
22
23
24
25
26
27
28
29
30
31
void Physics::HandleNarrowCollisions () for (auto & pair : colliderPairs) { Collider* colliderA = pair.first, * colliderB = pair.second; CollisionInfo collisionInfo = GJK_CheckCollision (colliderA, colliderB); if (collisionInfo.flag && collisionInfo.depth > 1e-3 ) collisionData.push_back (CollisionData (colliderA, colliderB, collisionInfo)); } } CollisionInfo GJK_CheckCollision (Collider* colliderA, Collider* colliderB) CollisionInfo result; glm::vec3 direction = glm::vec3 (1 , 0 , 0 ); std::vector<SupportPoint> simplex; simplex.push_back (GetMinkowskiSupport (colliderA, colliderB, direction)); direction = -simplex[0 ].point; for (int i = 0 ; i < 50 ; ++i) { SupportPoint next = GetMinkowskiSupport (colliderA, colliderB, direction); if (glm::dot (next.point, direction) < 0 ) return result; simplex.push_back (next); if (UpdateSimplex (simplex, direction)) EPA (simplex, colliderA, colliderB); } return result; }
冲量求解 在获取了碰撞信息(碰撞点和深度)后,就需要用冲量推回了,这里还是稍微详细的列下步骤:
顺序求解与迭代 :每帧将碰撞按穿透深度降序处理,并通过多次迭代(如4次)逐步收敛,减少误差累积。法向冲量 :基于相对速度、恢复系数和穿透深度计算法向冲量,用于分离物体并补偿穿透。切向摩擦 :根据相对切向速度分别计算静摩擦和动摩擦,将切向冲量限制在摩擦锥内,模拟表面阻力。刚体运动更新 :冲量同时改变线速度和角速度,通过世界空间惯性张量转换实现真实旋转响应。
1
2
3
4
5
6
7
8
9
10
11
12
13
14
15
16
17
18
19
20
21
22
23
24
25
26
27
28
29
30
31
32
33
34
35
36
37
38
39
40
41
42
43
44
45
46
47
48
49
50
51
52
53
54
55
56
57
58
59
60
61
62
63
64
65
66
67
68
69
70
71
72
73
74
75
76
77
78
79
80
81
82
83
84
85
86
87
88
89
90
91
92
93
94
95
96
97
98
99
100
101
102
103
void Physics::SolveCollisions (int iter) for (auto & data : collisionData) data.processed = false ; std::sort (collisionData.begin (), collisionData.end (), [](const CollisionData& a, const CollisionData& b) { return a.info.depth > b.info.depth; }); for (auto & data : collisionData) { if (data.processed) continue ; ApplyImpulse (data.colliderA, data.colliderB, data.info.normal, data.info.contactPointA, data.info.contactPointB, data.info.depth, iter); data.processed = true ; } } void Physics::ApplyImpulse (Collider* a, Collider* b, const glm::vec3& normal, const glm::vec3& contactPointA, const glm::vec3& contactPointB, float penetrationDepth, int iteration) float invMassA = (a->rigidbody->type == RigidbodyComponent::Dynamic) ? 1.0f / a->rigidbody->mass : 0.0f ; float invMassB = (b->rigidbody->type == RigidbodyComponent::Dynamic) ? 1.0f / b->rigidbody->mass : 0.0f ; glm::mat3 invInertiaA = CalculateWorldInverseInertia (a), invInertiaB = CalculateWorldInverseInertia (b); glm::vec3 rA = contactPointA - a->transform->position, rB = contactPointB - b->transform->position; glm::vec3 velA = a->rigidbody->velocity + glm::cross (a->rigidbody->angularVelocity, rA); glm::vec3 velB = b->rigidbody->velocity + glm::cross (b->rigidbody->angularVelocity, rB); glm::vec3 relativeVel = velB - velA; float normalVel = glm::dot (relativeVel, normal); if (normalVel > 0.2f ) return ; glm::vec3 crossA = glm::cross (rA, normal); glm::vec3 crossB = glm::cross (rB, normal); glm::vec3 invInertiaCrossA = invInertiaA * crossA; glm::vec3 invInertiaCrossB = invInertiaB * crossB; float termA = invMassA + glm::dot (crossA, invInertiaCrossA); float termB = invMassB + glm::dot (crossB, invInertiaCrossB); float denominator = termA + termB; if (denominator == 0.0f ) return ; float biasFactor = 0.3f * (1.0f - float (iteration) / iterations); float bias = biasFactor * penetrationDepth / deltaTime; float j = -(1.0f + restitution) * normalVel + bias; j = glm::max (0.0f , j / denominator); glm::vec3 impulse = j * normal; if (a->rigidbody->type == RigidbodyComponent::Dynamic) { a->rigidbody->velocity -= impulse * invMassA; a->rigidbody->angularVelocity += invInertiaA * glm::cross (rA, impulse); } if (b->rigidbody->type == RigidbodyComponent::Dynamic) { b->rigidbody->velocity += impulse * invMassB; b->rigidbody->angularVelocity += invInertiaB * glm::cross (rB, -impulse); } glm::vec3 tangent = relativeVel - normal * normalVel; float tangentLen = glm::length (tangent); if (tangentLen > 1e-3 ) { tangent = glm::normalize (tangent); float tangentVel = glm::dot (relativeVel, tangent); glm::vec3 crossAT = glm::cross (rA, tangent); glm::vec3 crossBT = glm::cross (rB, tangent); glm::vec3 invInertiaCrossAT = invInertiaA * crossAT; glm::vec3 invInertiaCrossBT = invInertiaB * crossBT; float termAT = invMassA + glm::dot (crossAT, invInertiaCrossAT); float termBT = invMassB + glm::dot (crossBT, invInertiaCrossBT); float denominatorT = termAT + termBT; if (denominatorT != 0.0f ) { float jt = -tangentVel / denominatorT; float friction = (fabs (tangentVel) < 0.01f ) ? staticFriction : dynamicFriction; float maxFriction = friction * fabs (j); jt = glm::clamp (jt, -maxFriction, maxFriction); glm::vec3 tangentImpulse = jt * tangent; if (a->rigidbody->type == RigidbodyComponent::Dynamic) a->rigidbody->velocity -= tangentImpulse * invMassA, a->rigidbody->angularVelocity += invInertiaA * glm::cross (rA, tangentImpulse); if (b->rigidbody->type == RigidbodyComponent::Dynamic) b->rigidbody->velocity += tangentImpulse * invMassB, b->rigidbody->angularVelocity += invInertiaB * glm::cross (rB, -tangentImpulse); } } }
位置修正 最后的这步沿穿透方向推出物体的位置修正其实不是必选项,只是为了修正下冲量方法带来的持续穿插表现罢了。在做物理时可以单走冲量亦或这个PBD方法,但由于冲量法更加物理,所以引擎还是主用的冲量法。
1
2
3
4
5
6
7
8
9
10
11
12
13
14
15
16
17
18
19
20
21
22
23
void Physics::ApplyPositionCorrections () for (auto & data : collisionData) { if (data.info.depth > 1e-3 ) { Collider* a = data.colliderA; Collider* b = data.colliderB; const CollisionInfo& info = data.info; float invMassA = (a->rigidbody->type == RigidbodyComponent::Dynamic) ? 1.0f / a->rigidbody->mass : 0.0f ; float invMassB = (b->rigidbody->type == RigidbodyComponent::Dynamic) ? 1.0f / b->rigidbody->mass : 0.0f ; float totalInvMass = invMassA + invMassB; glm::vec3 correction = info.depth / totalInvMass * info.normal * positionCorrectionFactor; a->transform->position -= correction * invMassA; b->transform->position += correction * invMassB; a->isDirty = true ; b->isDirty = true ; } } }
后记 至此引擎在点击Play后也能有一定表现,可喜可贺。但作为游戏/物理引擎这还是远远不够的,至少还得试试多线程。目前在release版放了2k个碰撞对后,物理帧耗时330微秒,FPS降到400+,留待后续对比。
并行 前言 之前已经实现了基础的物理模拟流程,但其在面对大量碰撞对时表现仍不算令人满意,为此接下来就要尝试并行化。第一步当然是写个线程池,靠线程池来管理线程和任务,之后再用图染色来避免应用冲量和位置修正时的加锁。
线程池 既然要上线程池,不如一步到位来个工作窃取平衡下负载。以下为线程池的大致结构。
1
2
3
4
5
6
7
8
9
10
11
12
13
14
15
16
struct ThreadPool { struct Worker { std::deque<std::function<void ()>> tasks; std::mutex mutex; }; std::vector<std::unique_ptr<Worker>> workers; std::vector<std::thread> threads; std::atomic<bool > stop; std::atomic<size_t > next_thread_index; std::mutex cv_mutex; std::condition_variable cv; };
分块同步 将区间均匀分块,再创建任务,提交到线程池
1
2
3
4
5
6
7
8
9
10
11
12
13
14
15
16
17
18
19
20
21
22
23
24
25
26
27
28
29
30
31
32
void ThreadPool::ParallelFor (size_t start, size_t end, std::function<void (size_t )> func) if (start >= end) return ; size_t total = end - start; size_t numThreads = workers.size (); size_t chunkSize = (total + numThreads - 1 ) / numThreads; std::atomic<size_t > remaining (0 ) ; std::mutex local_mutex; std::condition_variable local_cv; for (size_t t = 0 ; t < numThreads; ++t) { size_t blockStart = start + t * chunkSize; size_t blockEnd = std::min (blockStart + chunkSize, end); if (blockStart >= blockEnd) break ; remaining++; Enqueue ([this , blockStart, blockEnd, &func, &remaining, &local_cv, &local_mutex]() { for (size_t i = blockStart; i < blockEnd; ++i) { func (i); } std::unique_lock<std::mutex> lock (local_mutex); if (--remaining == 0 ) { local_cv.notify_one (); } }); } std::unique_lock<std::mutex> lock (local_mutex) ; local_cv.wait (lock, [&remaining] { return remaining == 0 ; }); }
任务提交 当有任务加入时,线程池会先轮询再尾插。
1
2
3
4
5
6
7
8
9
10
void ThreadPool::Enqueue (std::function<void ()> task) size_t target = next_thread_index.fetch_add (1 , std::memory_order_relaxed) % workers.size (); { std::unique_lock lock (workers[target]->mutex) ; workers[target]->tasks.push_back (std::move (task)); } cv.notify_one (); }
工作循环 而在主循环中会优先从本地队列头部取任务,若本地队列为空,尝试从尾部窃取窃取其他线程的任务,之后执行任务或进行等待。
1
2
3
4
5
6
7
8
9
10
11
12
13
14
15
16
17
18
19
20
21
22
23
24
25
26
27
28
29
30
31
32
33
34
35
36
37
void ThreadPool::WorkerLoop (size_t myIndex) Worker& myWorker = *workers[myIndex]; while (!stop) { std::function<void ()> task; { std::unique_lock lock (myWorker.mutex, std::try_to_lock) ; if (lock.owns_lock () && !myWorker.tasks.empty ()) { task = std::move (myWorker.tasks.front ()); myWorker.tasks.pop_front (); } } if (!task) { size_t numWorkers = workers.size (); for (size_t offset = 1 ; offset < numWorkers; ++offset) { size_t victimIdx = (myIndex + offset) % numWorkers; Worker& victim = *workers[victimIdx]; std::unique_lock lock (victim.mutex, std::try_to_lock) ; if (lock.owns_lock () && !victim.tasks.empty ()) { task = std::move (victim.tasks.back ()); victim.tasks.pop_back (); break ; } } } if (task) task (); else { std::unique_lock<std::mutex> lock (cv_mutex); cv.wait (lock, [this ] { return stop || has_any_task (); }); } } }
并行模拟 合并数据 之后所有的步骤都可以靠线程池的分块同步来改写。但需要注意的是在宽向检测和窄向检测时最后的结果都写了数组的,而如果走并行的话合并可以通过局部处理。
1
2
3
4
5
6
7
8
9
10
11
12
13
14
15
16
17
18
19
20
21
22
23
24
25
26
27
28
29
void ParallelPhysics::HandleNarrowCollisions () collisionData.clear (); size_t numPairs = colliderPairs.size (); if (numPairs == 0 ) return ; size_t numThreads = threadPool.thread_count (); size_t chunkSize = (numPairs + numThreads - 1 ) / numThreads; size_t numBlocks = (numPairs + chunkSize - 1 ) / chunkSize; std::vector<std::vector<CollisionData>> localData (numBlocks); threadPool.parallel_for (0 , numBlocks, [&](size_t blockIdx) { size_t start = blockIdx * chunkSize; size_t end = std::min (start + chunkSize, numPairs); auto & local = localData[blockIdx]; for (size_t i = start; i < end; ++i) { auto & pair = colliderPairs[i]; CollisionInfo info = GJK_CheckCollision (pair.first, pair.second); if (info.flag && info.depth > 1e-3 f) { local.emplace_back (pair.first, pair.second, info); } } }); for (auto & local : localData) { collisionData.insert (collisionData.end (), local.begin (), local.end ()); } }
图染色分组 以及在冲量处理和位置修正时为了无锁用的图染色分组。大致为将碰撞对视为图中的边,刚体视为图中的顶点。需要为每条边分配一种颜色(组号),使得相邻的边不能有相同颜色。引擎中采用一种近似贪婪算法,快速生成可并行的组。使得每个组内的碰撞对不共享任何刚体,从而可以在组内安全地并行求解。
1
2
3
4
5
6
7
8
9
10
11
12
13
14
15
16
17
18
19
20
21
22
23
24
25
26
27
28
29
30
31
32
33
34
35
36
37
38
39
40
41
42
43
44
45
46
47
48
49
50
51
52
53
void ParallelPhysics::BuildCollisionGroups () collisionGroups.clear (); if (collisionData.empty ()) return ; std::sort (collisionData.begin (), collisionData.end (), [](const CollisionData& a, const CollisionData& b) { return a.info.depth > b.info.depth; }); static std::vector<int > bodyMask; static std::vector<int > bodyEpoch; static int globalEpoch = 0 ; size_t maxId = 0 ; for (auto & data : collisionData) { maxId = std::max (maxId, (size_t )data.colliderA->id); maxId = std::max (maxId, (size_t )data.colliderB->id); } if (bodyMask.size () <= maxId) { bodyMask.resize (maxId + 1 , 0 ); bodyEpoch.resize (maxId + 1 , 0 ); } ++globalEpoch; for (auto & data : collisionData) { int aId = data.colliderA->id; int bId = data.colliderB->id; int groupIdx = 0 ; while (true ) { if (groupIdx >= (int )collisionGroups.size ()) { collisionGroups.emplace_back (); collisionGroups.back ().push_back (&data); bodyMask[aId] = groupIdx + 1 ; bodyEpoch[aId] = globalEpoch; bodyMask[bId] = groupIdx + 1 ; bodyEpoch[bId] = globalEpoch; break ; } bool aOccupied = (bodyEpoch[aId] == globalEpoch && bodyMask[aId] == groupIdx + 1 ); bool bOccupied = (bodyEpoch[bId] == globalEpoch && bodyMask[bId] == groupIdx + 1 ); if (!aOccupied && !bOccupied) { collisionGroups[groupIdx].push_back (&data); bodyMask[aId] = groupIdx + 1 ; bodyEpoch[aId] = globalEpoch; bodyMask[bId] = groupIdx + 1 ; bodyEpoch[bId] = globalEpoch; break ; } ++groupIdx; } } }
后记 这么整上后release版的2k个碰撞对,物理帧耗时90微秒,FPS 1500+,对比串行的330微秒,FPS 400+算是成果显著。当然也不得不吐槽多线程实在太难整了,最开始没想自己写,依次尝试了OpenMP,TaskFlow,PPL,表现都和串行的相当,最后还得是自己搓多线程。以及在有了当前版本后又尝试了C20屏障,以为能再进一步,但表现又和串行相当。累了,就先这样吧。

 wechat
 alipay