Previous articles covered the engine’s initial architecture, basic rendering, physics simulation, and parallelization. I was planning to wrap up and focus on my thesis and job hunting, but one day I stumbled upon Krystallos Engine next door. Something just clicked—I couldn’t sleep, hacked away for a week, and here we are with this major overhaul.
Project Management
Written Before
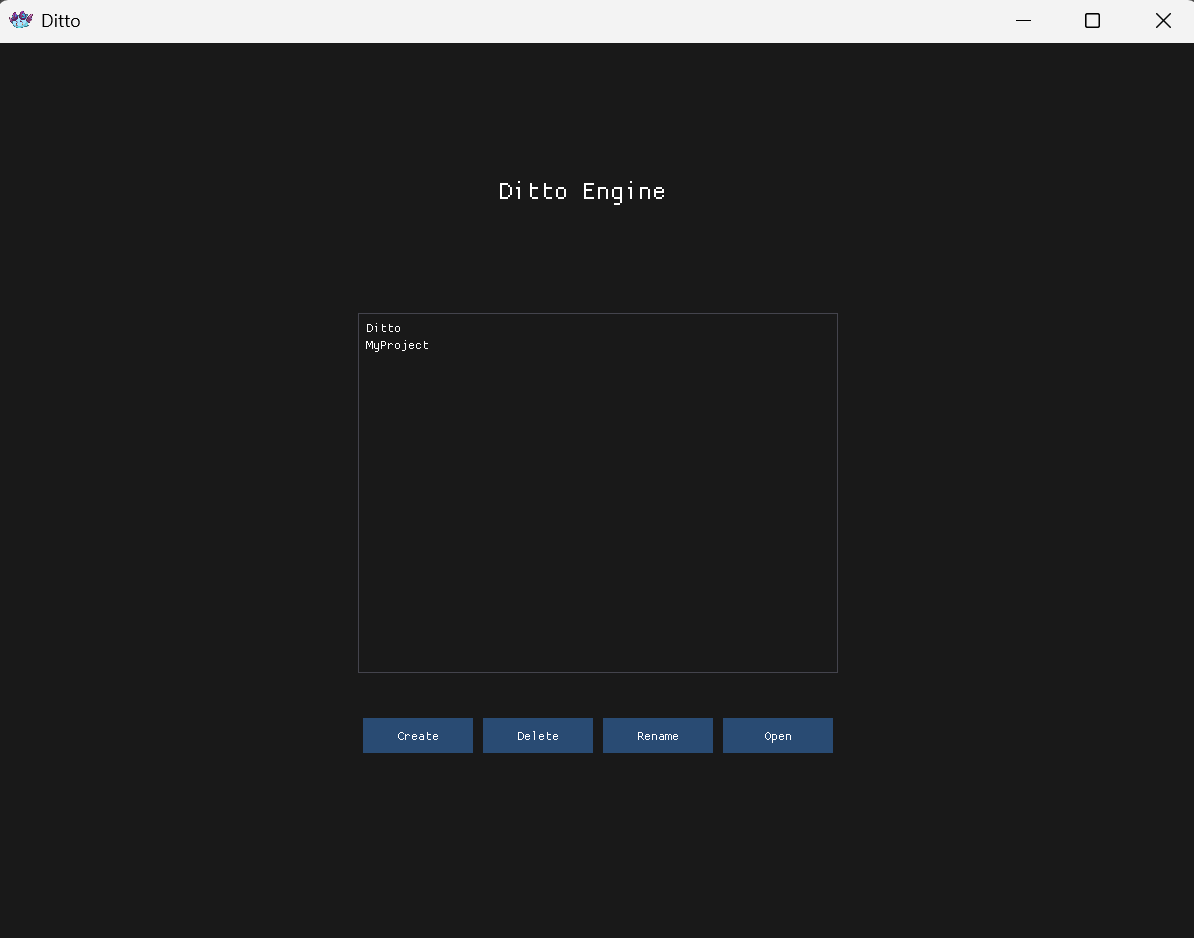
The engine now supports multiple projects, so the first step when opening the engine is to select a project. The project management interface displays at startup, allowing you to create new projects or open existing ones.
Startup
At startup, check whether a project exists. If not, show the project selector:
void Editor::DrawProjectSelector() { ImGui::SetNextWindowPos(ImVec2(0, 0), ImGuiCond_Always); ImGui::SetNextWindowSize(ImVec2((float)viewportSize.x, (float)viewportSize.y)); ImGuiWindowFlags flags = ImGuiWindowFlags_NoTitleBar | ImGuiWindowFlags_NoResize | ImGuiWindowFlags_NoMove | ImGuiWindowFlags_NoBackground; ImGui::Begin("ProjectSelector", &open, flags); // Left side: project list ImGui::BeginChild("ProjectList", ImVec2(300, 0)); ImGui::Text("My Projects"); ImGui::Separator(); // Iterate through all projects in the Projects directory std::vector<std::string> projects = GetAllProjects(); for (const auto& project : projects) { if (ImGui::Selectable(project.name.c_str(), selected == project.name)) { selected = project.name; OpenProject(project.path); } } if (ImGui::Button("New Project", ImVec2(-1, 0))) showNewProjectPopup = true; ImGui::EndChild(); // Right side: project preview ImGui::SameLine(); ImGui::BeginChild("ProjectPreview"); ImGui::Text("Select a project to open"); ImGui::EndChild(); ImGui::End(); }
Written Behind
Project management involves project path resolution, JSON read/write, scene auto-loading, and othermiscellaneous tasks. Thankfully, it all works now.
Docking System
Written Before
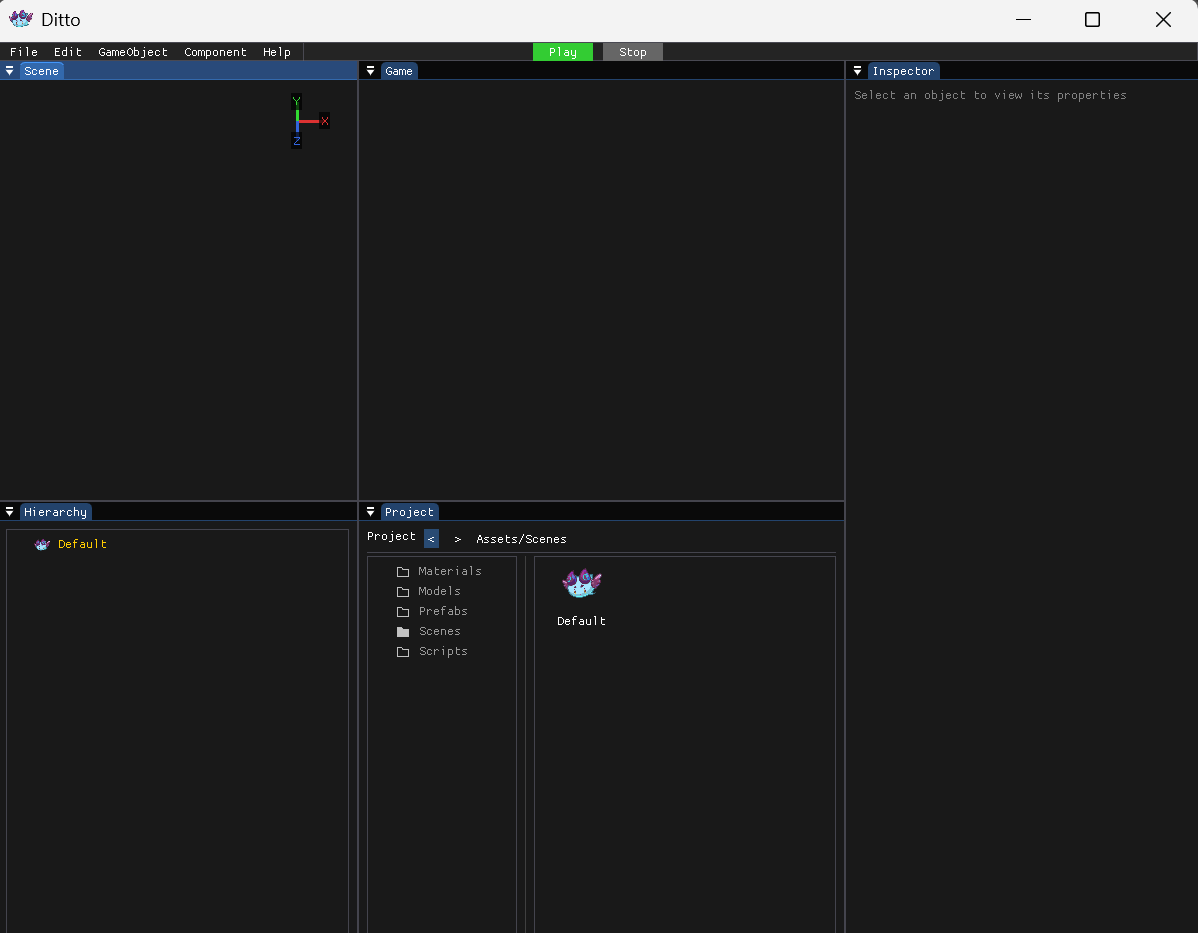
After selecting a project, you enter the main interface. The previous interface used the most primitive “manual region division” approach: Hierarchy takes left 1/8, Scene takes middle 1/2, Inspector takes right 1/4. While functional, extensibility was terrible—you couldn’t freely drag, resize, or create multi-view layouts like Unity. Fortunately, ImGui itself supports Docking, so here’s the new system.
Enable Docking
Enable Docking when initializing ImGui, along with Viewport for multi-window support:
On first run, manually split window regions. Code uses a classic five-way layout: left top/bottom (Hierarchy + Project), center top/bottom (Scene + Game), right (Inspector):
void Editor::DrawLayoutMenu() { if (ImGui::BeginMenu("Layout")) { if (ImGui::MenuItem("Save Layout...")) showSaveLayoutPopup = true;
if (ImGui::BeginMenu("Load Layout")) { std::vector<std::string> layouts = GetSavedLayouts(); for (const auto& layoutName : layouts) { if (ImGui::MenuItem(layoutName.c_str())) LoadLayout(layoutName); } ImGui::EndMenu(); } ImGui::EndMenu(); } }
Written Behind
The docking system elevated the engine’s UI from “stone age” to a modern editor standard. You can now freely drag windows, resize them, and save layouts. The tradeoff is that ImGui’s INI file becomes important—once corrupted, the interface becomes… memorable.
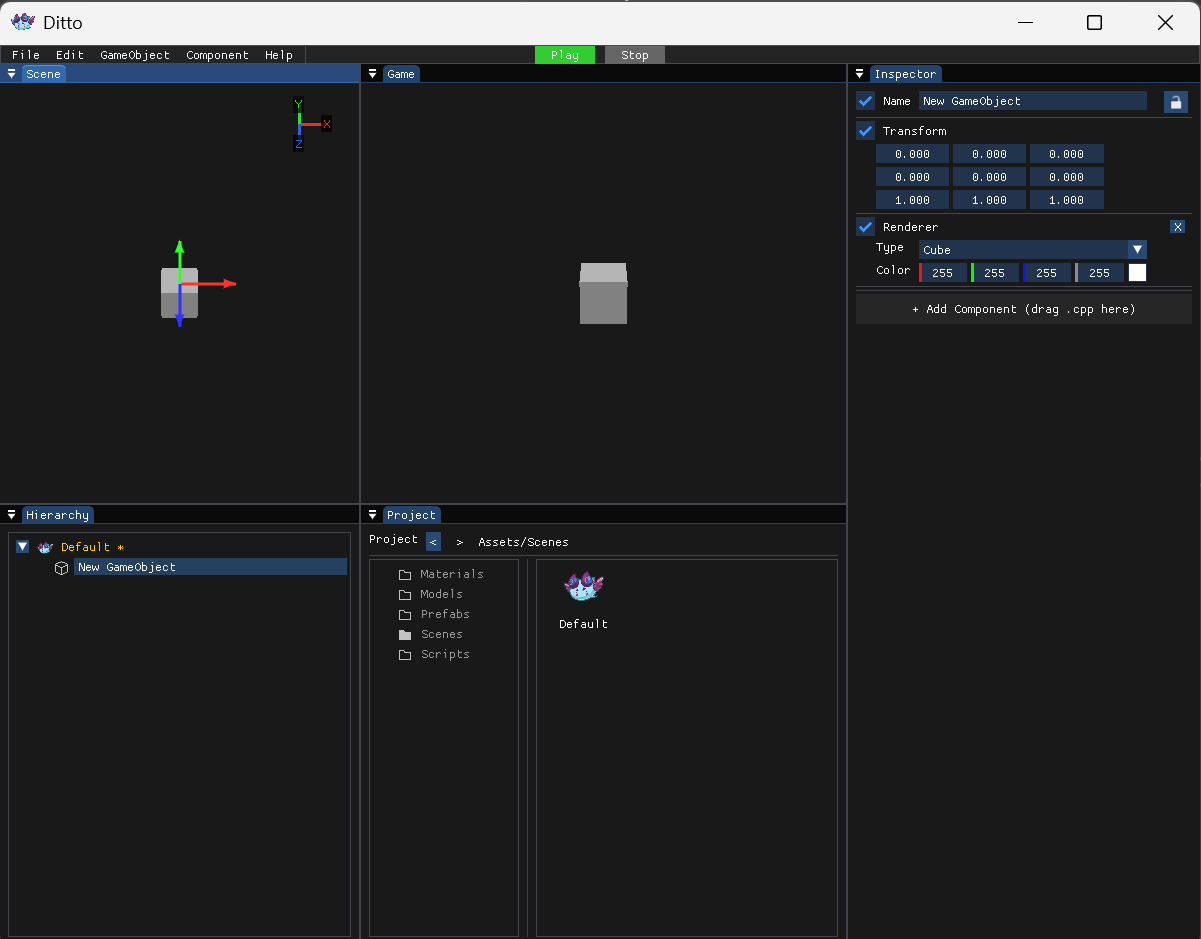
Scene Interaction
Written Before
The Scene view was view-only before. Now it finally has interactive features: axis indicator, transform tools (Gizmo), and camera controls.
Axis Indicator
Top-right corner displays a small axis indicator showing real-time camera orientation:
1 2 3 4 5 6 7 8 9 10 11 12 13 14
void SceneWindow::DrawAxisGizmo() { // Draw in top-right corner ImVec2 center(windowPos.x + windowSize.x - gizmoSize * 0.5f - padding, ...); // Get camera basis vectors glm::vec3 camRight = camera->right; glm::vec3 camUp = camera->up; glm::vec3 camForward = camera->forward; // Project world axes to view space // Sort by depth, draw back first drawList->AddLine(center, endPoint, axis.color, lineThickness); }
Similar to Unity’s top-right axis indicator: red=X, green=Y, blue=Z.
Transform Tools
Press W/E/R to switch between three transform modes:
void SceneWindow::DrawRotateGizmo() { // Draw three rings (only back half based on camera) for (int i = 0; i <= segments; i++) { // YZ plane (X axis), XZ plane (Y axis), XY plane (Z axis) } }
void SceneWindow::DrawScaleGizmo() { // Draw three axes + end boxes drawList->AddRectFilled(...); }
Mouse Interaction
Left-drag Gizmo: Transform selected object
Right-drag: Rotate camera view
Arrow keys: Move camera forward/backward/left/right
void SceneWindow::HandleMouseInput() { // Raycast to detect selected axis m_highlightedAxis = RaycastGizmos(mousePos); // Calculate mouse movement projected to screen space float projectedDelta = mouseDelta.x * screenAxisDir.x + mouseDelta.y * screenAxisDir.y; // Apply transform based on current tool mode switch (m_toolMode) { case ToolMode::Translate: transform->position = newPos; break; case ToolMode::Rotate: transform->rotation = newRot; break; case ToolMode::Scale: transform->scale = newScale; break; } }
Written Behind
Finally, you can happily drag objects around in the Scene view. While the Gizmo raycasting and coordinate projection still have room for optimization, it works. Next steps: grid plane snapping and multi-select batch transforms—those are for later.
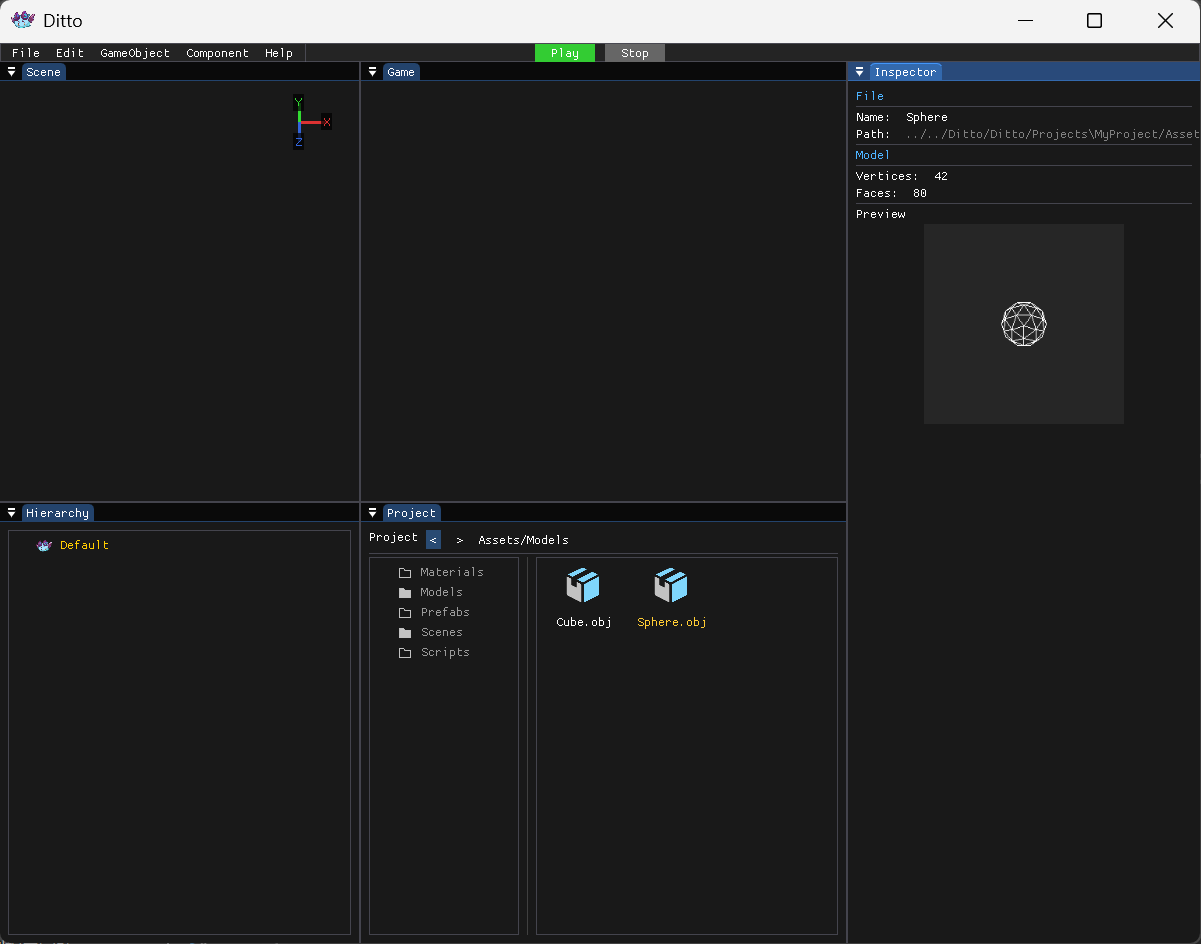
File Browser
Written Before
After selecting a project, you see the Project window. The previous Project window was basically just a texture viewer with no folder navigation. This time, it’s a complete file browser.
Basic Structure
The file browser maintains current path, expanded folder list, file icon mappings, and other states:
3D model preview massively improves the experience—at least you know what the model looks like without jumping to the Scene view.
Scripting System
Written Before
Tried C++ scripting before, but manually registering all variables and functions was too tedious. DLL approach like UE requires compiling before use, which isn’t great either. Finally went with C# like Unity.
C# Base Library
Engine provides a base C# library DittoEngine.dll, similar to Unity’s UnityEngine:
namespace DittoEngine { // Transform component public class Transform { public Vector3 position { get; set; } public Vector3 rotation; public Vector3 scale; } // Vector3 public struct Vector3 { public float x, y, z; } // MonoBehaviour base class public class MonoBehaviour { public GameObject gameObject; public Transform transform => gameObject?.transform; public virtual void Start() { } public virtual void Update() { } public virtual void OnDestroy() { } } public class GameObject { public string name; public Transform transform; } }
Field Parsing
Public variables in C# scripts need parsing on the C++ side for display and editing in Inspector:
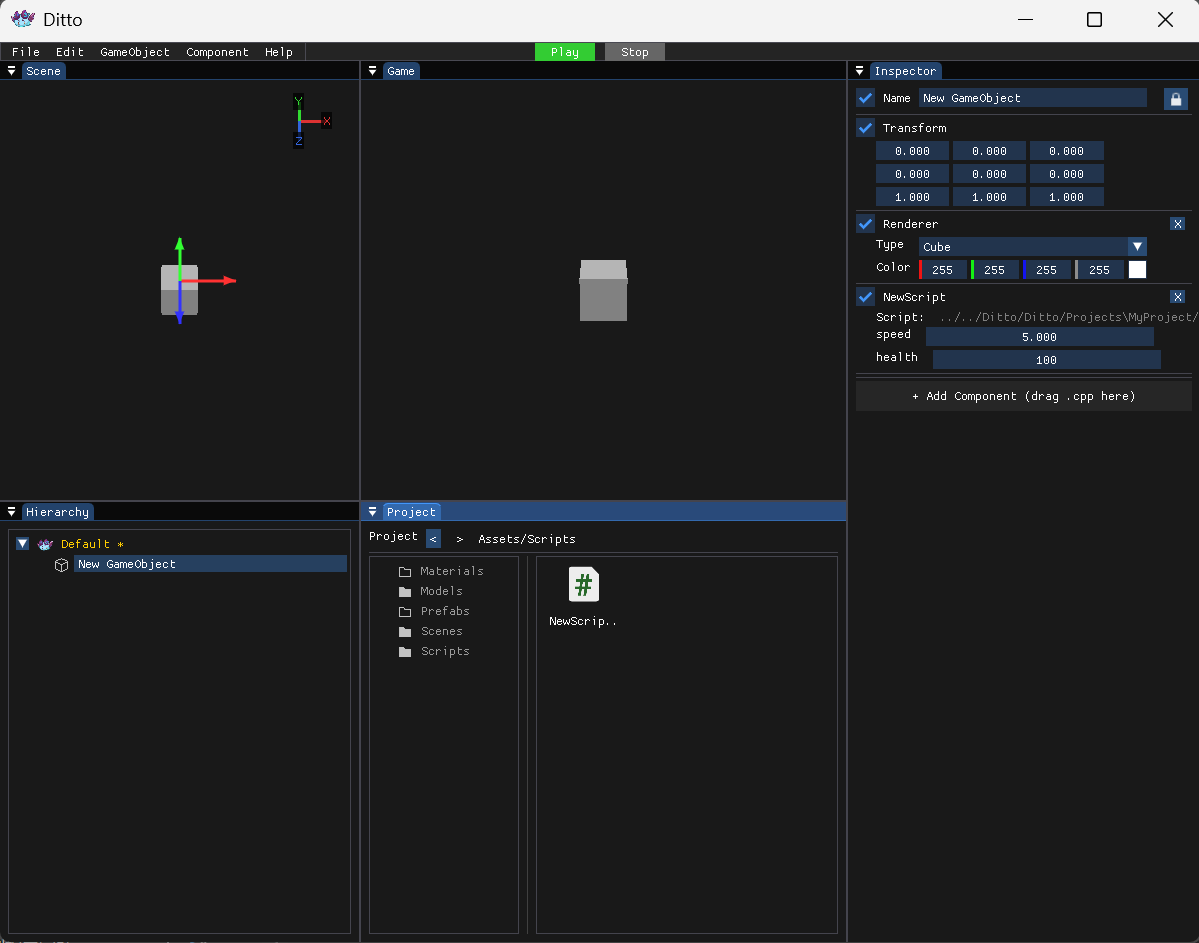
Display script’s public fields in Inspector with real-time editing:
1 2 3 4 5 6 7 8 9 10 11 12 13 14 15 16 17 18 19
void CSharpScriptComponent::OnInspectorGUI()
{
    ImGui::Checkbox("##Enabled", &enabled);
    ImGui::SameLine();
    ImGui::TextUnformatted(scriptName.c_str());

    for (auto& field : fields)
    {
        switch (field.type)
        {
            case ScriptFieldType::Float:
                ImGui::DragFloat(field.name.c_str(), &std::get<float>(field.value));
                break;
            case ScriptFieldType::Vector3:
                ImGui::DragFloat3(field.name.c_str(), &std::get<glm::vec3>(field.value).x);
                break;
        }
    }
}
Written Behind
The scripting system can now run. By integrating .NET runtime, C# script Start/Update lifecycle methods can truly integrate with C++, achieving runtime script invocation like Unity. More details in a future article.
Summary
The engine UI has been completely transformed. Project management, docking system, file browser, model preview, scripting system, scene interaction—these are standard features in commercial engines, but getting them working in a personal engine took serious effort. Time to focus on thesis and job hunting. If I keep polishing, I’ll never graduate, never find a job… might as well live under a bridge (

 wechat
 alipay