Honkai Star Rail Bartending
Written before
I am an old player of MiHoYo, and a veteran of Honkai Impact 3rd. Although I gave up playing Honkai Impact 3rd after the first part was finished, the gameplay effect of the bartending in HSR last year was amazing. In addition, MiHoYo announced the related technology patent at the end of last year, and in the recent question I answered with ycz, she mentioned the liquid surface simulation of spring particles, which I think deserved to take a try. First of all, I would like to thank Yidi1D for the Layered Liquid Bottle. My personal direction is mainly the engine tool and physical simulation, not very proficient in rendering. I learned a lot from the article.
Patent Introduction
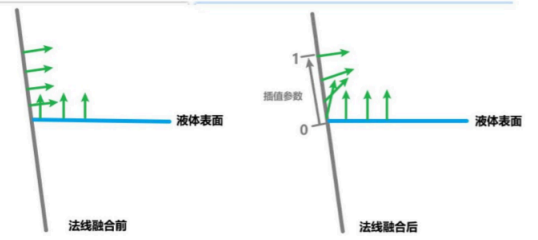
The patent contains a lot of nonsense, and there are only two points that give some information: the first is the spring skeleton model, which takes the center of mass as the starting point and the liquid surface as the end point, and then constructs the liquid surface equation using the point and normal, and finally constructs the entire virtual liquid surface by intersecting the camera rays; the second is the fusion of the inner wall and the liquid surface normal at the joint to express the surface tension. It is quite disappointing to read it. The title says “liquid simulation method”, but the real simulation only involves a spring, and the rest is all about rendering. I personally feel that it is quite trivial, so I will not reproduce it in a fundamentalist way, and start my own reproduction based on simulation.

Real-time rendering
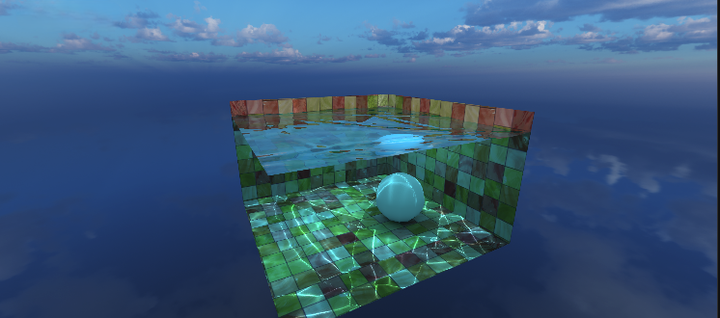
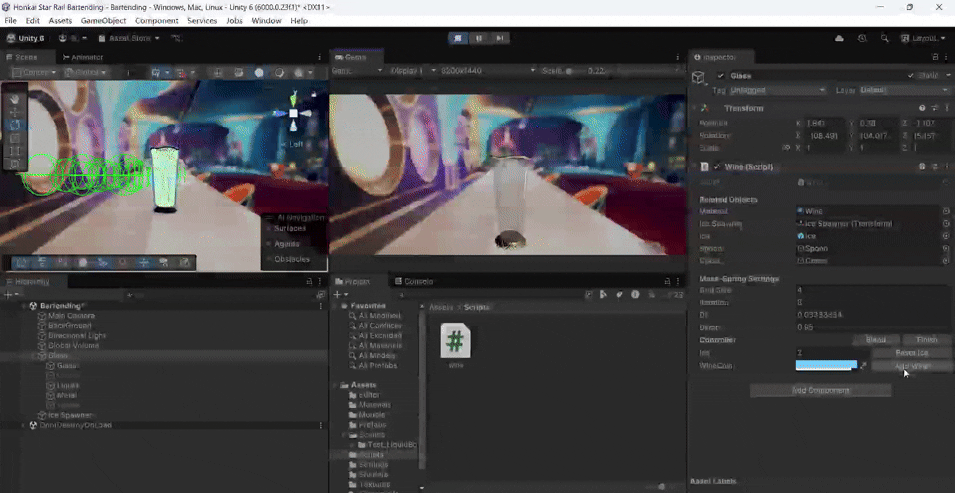
I found some bartending tool models online, and some of them were borrowed from Yidi1D. I also put a picture of a bartending table as the background, which made it look more similar to the game scene. For the scene rendering, I hand-wrote PBR and customized Phong models to adapt to the model textures. The bartending rendering was based on Yidi1D’s stipple transparency and liquid layering lerp.
Stipple transparency
Stipple transparency is to deal with the rendering order of ice and liquid, which are both transparent. The two should interact with each other, but I was too lazy to change the SRP pipeline, so I gave the ice a 16-level stipple transparency. A more detailed explanation is [here](Unity Stipple Transparency Shader - Alex Ocias Blogocias.com/blog/unity-stipple-transparency-shader/). The general idea is to cut out some pixels with a preset transparency probability. It’s a very old technology. I miss the FC era. Although it was limited by hardware, people at that time were really creative, so the appearance of the animal well was so eye-catching… In the subsequent GIF, you can see that the ice has obvious stripes. The reason is that the pixel cropping is based on the screen space and the multiple windows opened lead to insufficient resolution of the game window. This problem will not occur after full screen.
Liquid lerp
When interpolating the liquid surface layer line, I just use the min and max functions to directly interpolate the upper and lower layer colors. I personally feel that there is no difference in disturbance. Although this may be criticized by the artist, it doesn’t matter because I am not TA (

1 | f = saturate((frac(h) - 0.5 + _BlendFrac) / (2 * _BlendFrac)); |
Physics simulation
Then there is the self-creation of the simulation part. Based on my personal experience playing in HSR, I feel that MiHoYo focuses more on rendering than simulation: the patent summarizes that “the spring particle grid is very expensive, so we use a single spring”, “players value visual details, so we have to do normal blending”; and in the new version, the bath of Amphoreus, the splashes are extremely exaggerated and should not be simulated. The water fluctuation SWE or mean diffusion will do. Since it’s all on the computer, why not some physical splash effects to put pressure on the GPU?
Physical Interaction
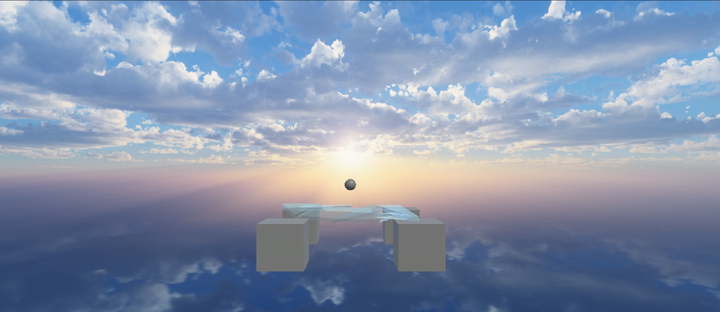
Back to the topic, for the physical simulation of bartending, I use 4x4 spring particles and 8 iterations. After all, the size of the liquid surface is not large, and the mean diffusion of the pool next door can be used to blur the 64x64 Custom Render Texture (CRT). Initialize the state-pressure constraint (ACM sequelae), and update to use PBD (it’s easy to do after writing so many cloths). I personally feel that the spring particle simulation liquid surface equation is suitable for the situation of solid-liquid coupling interaction, so when adding ice cubes and stirring, it is also abstracted as a particle and a spring particle grid interaction. Finally, the spring particle information is passed to the Shader with ComputeBuffer, and the task on the C# script side comes to an end.
1 | // Mass-Spring |
Surface construction
The task of the shader is to use the spring mass mesh height and normal information. Lerp is definitely not an option. I tried SmoothStep, but it even was not as good as Lerp. Finally, I had to use CosStep, which I wrote myself. I used CosStep for mean diffusion before. I suggest Unity integrate trigonometric function interpolation as well. I am too lazy to write it myself every time. I will only show the cosine interpolation of height. The normal part is exactly the same, so there is no need to fill the word count here.
1 | int _GridSize; |
Written behind
As usual, we end with the finished product, which also adds lots of details. The GIF resolution limit makes it hard to see bubbles. MiHoYo probably used the same exaggerated animation curve control as Yidi1D, and the spring particle grid is very physical. In terms of performance, a 4x4 simple grid plus 8 iterations doesn’t cost much, feels like it can be used for small liquid surfaces that require solid-liquid coupling.
The rest are just some random thoughts. The spring recruitment and summer internship have started. I will take a look at the UE physics source code and then prepare to apply for foreign companies and overseas companies. After all, this study abroad is also for WLB. MiHoYo really does what it pays. The Final Lesson, Meteoric Salvation, Everlasting Flames, Elysian Realm, and GraduationTrip of Honkai Impact 3 of Honkai Impact 3, Xianzhou Luofu, Penacony, Amphoreus of Honkai Star Rail. I hope MiHoYo can continue to prosper, and I will try my best to leave my own story in the end.
 wechat
 alipay